【Kotlin×Android×SQLite】データベースを使いメモアプリを作る
AndridにはSQLiteというデータベース(DB)が用意されています。
これを使えばファイルでは管理できないような複雑な構造のデータも扱えるようになります。
今回はDBの操作方法について紹介します。
サンプルとして簡単なメモ機能を持ったアプリを作成します。
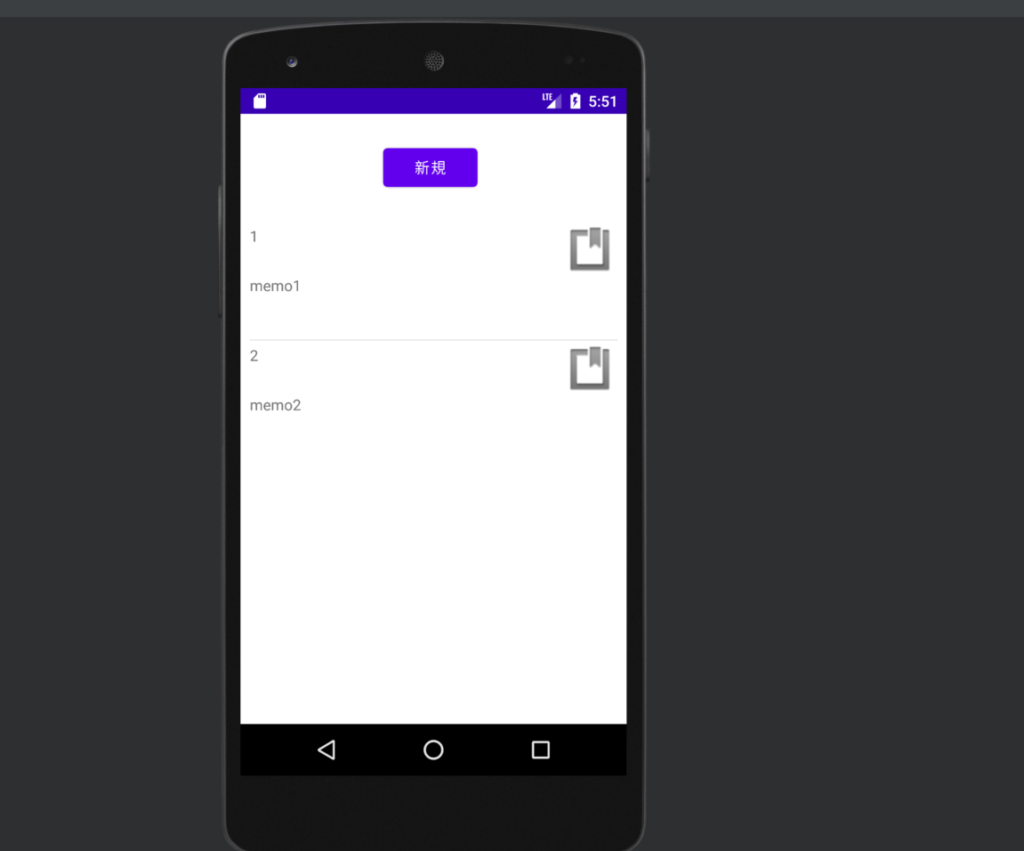
メモ一覧画面と、作成画面をもちます。
それぞれ以下のようなレイアウトを予定しています

今回用意するクラスは以下の通りです
- MainActivity
- メモの位置一覧を表示する
- DBHelperを使用してメモの一覧を取得する
- リストのメモのタイトルをタップするとメモ更新ページに遷移する
- 「新規ボタン」をタップするとメモ作成ページに遷移する
- メモの位置一覧を表示する
- MemoActivity
- メモの登録、更新、削除を行う
- DBHelper
- SQLiteOpenHelperクラスを継承したクラス
- DBに関する捜査をしてくれる
- MainActivityなどでこのクラスのオブジェクトを生成して使う
また以下の記事で作成したCustomListAdapterクラス、ListItemデータクラス、list_item.xml(レイアウトファイル)を使用します。
MainActivity
package com.example.dbsample

import android.content.Intent
import android.os.Bundle
import com.google.android.material.snackbar.Snackbar
import androidx.appcompat.app.AppCompatActivity
import androidx.navigation.findNavController
import androidx.navigation.ui.AppBarConfiguration
import androidx.navigation.ui.navigateUp
import androidx.navigation.ui.setupActionBarWithNavController
import android.view.Menu
import android.view.MenuItem
import android.widget.*
import com.example.dbsample.databinding.ActivityMainBinding

class MainActivity : AppCompatActivity() {
    override fun onCreate(savedInstanceState: Bundle?) {
        super.onCreate(savedInstanceState)
        setContentView(R.layout.activity_main)
        val add = findViewById<Button>(R.id.add)
        val listView = findViewById<ListView>(R.id.listView)
        setListViewAdapter(listView)

        add.setOnClickListener {
            val intent = Intent(this, MemoActivity::class.java)
            startActivity(intent)
        }

        listView.setOnItemClickListener { av, view, position, id ->
            val intent = Intent(this, MemoActivity::class.java)
            val itemId = listView.adapter.getItemId(position)
            intent.putExtra("id", itemId)
            startActivity(intent)
        }
    }

    override fun onResume() {
        super.onResume()
        val helper = DBHelper(this)
        val listView = findViewById<ListView>(R.id.listView)
        setListViewAdapter(listView)
    }

    fun setListViewAdapter(listView: ListView)
    {
        val helper = DBHelper(this)
        helper.readableDatabase.use {
                db -> db.query("memos", arrayOf("id", "title", "content"),null,null,null,null,null,null)
            .use { cursor ->
                val memoList = mutableListOf<ListItem>()
                if (cursor.moveToFirst()) {
                    for (i in 1..cursor.count) {
                        val memoId = cursor.getInt(0)
                        val title = cursor.getString(1)
                        memoList.add(ListItem(memoId.toLong(), title))
                        cursor.moveToNext()
                    }
                }
                listView.adapter = CustomListAdapter(this, memoList, R.layout.list_item)
            }
        }
    }
}
このクラスの処理は以下の通りです。
- 「新規ボタン」が押されたときの挙動設定
- メモ作成画面(MainActivity)に遷移する
- メモ一覧の行をタップしたときの挙動設定
- その行のid(memosテーブルのid)を遷移先に渡しMainActivityへ遷移
- メモ一覧の設定
- データベースのmemosテーブルからメモの一覧を取得する
今回の課題であるDBの操作部分について解説します。
データベースからメモの一覧を取得している箇所は以下の部分です
        helper.readableDatabase.use {
                db -> db.query("memos", arrayOf("id", "title", "content"),null,null,null,null,null,null)
            .use { cursor ->
                val memoList = mutableListOf<ListItem>()
                if (cursor.moveToFirst()) {
                    for (i in 1..cursor.count) {
                        val memoId = cursor.getInt(0)
                        val title = cursor.getString(1)
                        memoList.add(ListItem(memoId.toLong(), title))
                        cursor.moveToNext()
                    }
                }
                listView.adapter = CustomListAdapter(this, memoList, R.layout.list_item)
            }
        }
データベースからの情報取得は DBHelperオブジェクトの readableDatabase(SQLiteDataBaseオブジェクト) プロパティが担当します。
readableDatabaseを取得すると読み込みモードでデータベースが開かれます。
実際の取得処理はreadableDatabase.useブロックの中です。
queryメソッドを使用してメモ一覧を取得します。
このメソッドに渡す引数は以下の通りです。
- queryメソッドを使用してメモ一覧取得
- 引数
- テーブル名
- 取得するカラムの配列
- 条件式
- メモすべてを取得したいためここでは条件を指定してない
- 例: 「id = ?」
- 今回はnull
- 条件値
- 配列で指定する
- 今回はnull
- グループ化
- group by
- カラムを指定
- 今回はnull
- グループの絞り込み条件
- having
- 今回はnull
- ソート
- order by
- 今回はnull
- 取得するレコード数
- limit
- 今回はnull
- 引数
queryメソッドからCursorオブジェクトが返却されます。
Cursorオブジェクトは取得した結果と読み取り方法を提供するものです。
このCursorオブジェクトに対して以下のように処理を行います
- moveToFirstメソッドで「読み取り対象」の行を一番上に設定
- データがない場合(メモが一つもない)null
- レコード数分以下の処理を繰り返す
- 各レコードのidとタイトルを取得しListItemクラスのコンストラクタに渡しリストに追加する
- moveToNextで次の行を「読み取り対象」に設定
- ListViewのadapterを設定
以上で取得処理は終了です。
このActivityで使うレイアウトファイルです
<?xml version="1.0" encoding="utf-8"?>
<androidx.constraintlayout.widget.ConstraintLayout xmlns:android="http://schemas.android.com/apk/res/android"
    xmlns:app="http://schemas.android.com/apk/res-auto"
    xmlns:tools="http://schemas.android.com/tools"


    android:id="@+id/coordinatorLayout2"
    android:layout_width="match_parent"
    android:layout_height="match_parent">

    <androidx.constraintlayout.widget.ConstraintLayout
        android:id="@+id/constraintLayout"
        android:layout_width="310dp"
        android:layout_height="68dp"
        android:layout_marginStart="37dp"
        android:layout_marginTop="16dp"
        android:layout_marginEnd="37dp"
        app:layout_constraintEnd_toEndOf="parent"
        app:layout_constraintStart_toStartOf="parent"
        app:layout_constraintTop_toTopOf="parent">

        <Button
            android:id="@+id/add"
            android:layout_width="wrap_content"
            android:layout_height="wrap_content"
            android:layout_marginStart="108dp"
            android:layout_marginTop="21dp"
            android:layout_marginEnd="115dp"
            android:layout_marginBottom="19dp"
            android:text="新規"
            app:layout_constraintBottom_toBottomOf="parent"
            app:layout_constraintEnd_toEndOf="parent"
            app:layout_constraintHorizontal_bias="0.0"
            app:layout_constraintStart_toStartOf="parent"
            app:layout_constraintTop_toTopOf="parent"
            app:layout_constraintVertical_bias="0.55" />

    </androidx.constraintlayout.widget.ConstraintLayout>

    <ListView
        android:id="@+id/listView"
        android:layout_width="343dp"
        android:layout_height="0dp"
        android:layout_marginStart="1dp"
        android:layout_marginTop="16dp"
        android:layout_marginEnd="1dp"
        app:layout_constraintEnd_toEndOf="parent"
        app:layout_constraintStart_toStartOf="parent"
        app:layout_constraintTop_toBottomOf="@+id/constraintLayout" />
</androidx.constraintlayout.widget.ConstraintLayout>
MemoActivity
package com.example.dbsample

import android.content.ContentValues
import android.os.Bundle
import android.widget.Button
import android.widget.EditText
import android.widget.Toast
import androidx.appcompat.app.AppCompatActivity

class MemoActivity: AppCompatActivity() {

    companion object{
        private const val TABLE_NAME="memos"
    }

    override fun onCreate(savedInstanceState: Bundle?) {
        super.onCreate(savedInstanceState)
        setContentView(R.layout.memo)

        val helper = DBHelper(this)
        val textTitle = findViewById<EditText>(R.id.text_title)
        val textContent = findViewById<EditText>(R.id.text_content)
        val memoId: Long = intent.getLongExtra("id",0)
        if (memoId != 0L) {
            helper.readableDatabase.use {
                db -> db.query(TABLE_NAME, arrayOf("id", "title", "content"), "id = ?", arrayOf(memoId.toString()), null, null, null, "1")
                .use { cursor ->
                    if (cursor.moveToFirst()) {
                        textTitle.setText(cursor.getString(1))
                        textContent.setText(cursor.getString(2))
                    }
                }
            }
        }

        findViewById<Button>(R.id.save_button).setOnClickListener{
            helper.writableDatabase.use {
                db ->
                    val values = ContentValues().apply {
                        put("title", textTitle.text.toString())
                        put("Content", textContent.text.toString())
                    }
                    if (memoId != 0L) {
                        db.update(TABLE_NAME, values,"id = ?", arrayOf(memoId.toString()))
                    } else {
                        db.insert(TABLE_NAME,null, values)
                    }
            }
            finish()
        }

        findViewById<Button>(R.id.delete_button).setOnClickListener {
            helper.writableDatabase.use {
                db ->
                    db.delete(TABLE_NAME, "id = ?", arrayOf(memoId.toString()))
                    Toast.makeText(this, "削除しました", Toast.LENGTH_SHORT).show()
            }
            finish()
        }

        findViewById<Button>(R.id.back_button).setOnClickListener {
            finish()
        }
    }
}
このクラスの処理は以下の通りです。
- 「保存」ボタンの挙動設定
- メモの作成
- MainActivityからメモのid(memoId)が送られてきている場合、更新
- 作成、更新後MainActivityに戻る
- 「削除」ボタンの挙動設定
- メモの削除
- memoIdを指定する
- 削除後MainActivityに戻る
- 「戻る」ボタンの挙動設定
- MainActivityに戻る
- メモ情報の表示
- memoIdがある場合のみ
- memoIdを使いデータベースからメモ情報を取得する
- 取得後Viewに設定
・メモ情報の取得処理
            helper.readableDatabase.use {
                db -> db.query(TABLE_NAME, arrayOf("id", "title", "content"), "id = ?", arrayOf(memoId.toString()), null, null, null, "1")
                .use { cursor ->
                    if (cursor.moveToFirst()) {
                        textTitle.setText(cursor.getString(1))
                        textContent.setText(cursor.getString(2))
                    }
                }
            }
一覧取得の時と同じようにqueryメソッドを使用します。
今回は条件式にidを指定しています。
そのため条件値にもメモIDをもった配列を渡しています。
あとは一覧取得と同じですね。
moveToFirstで読み取り対象を指定して、情報をViewに設定しています。
メモの保存、更新処理
            helper.writableDatabase.use {
                db ->
                    val values = ContentValues().apply {
                        put("title", textTitle.text.toString())
                        put("Content", textContent.text.toString())
                    }
                    if (memoId != 0L) {
                        db.update(TABLE_NAME, values,"id = ?", arrayOf(memoId.toString()))
                    } else {
                        db.insert(TABLE_NAME,null, values)
                    }
            }
メモの保存処理は取得処理とは違いwritableDatabaseプロパティを使います。
これでデータベースが書き込みモードで開かれます。
readableDatabase使用時もそうでしたが、
処理後データベースを自動で閉じさせるためuseブロックを使用しています。
memoIdがある場合更新、ない場合登録という挙動になっています。
レコードの作成にはinsertメソッドを使用します。
insertメソッドの引数です。
- テーブル名
- null列に設定する値を指定
- 今回はnull
- 登録する値
- ContentValuesオブジェクトを使用
- 設定する情報はタイトルと本文
updateメソッドの引数
- テーブル名
- 更新する情報
- ContentValuesオブジェクトを使用
- 設定する情報はタイトルと本文
- 条件式
- idを指定
- 条件値
- memoIdを使用
メモの削除処理
            helper.writableDatabase.use {
                db ->
                    db.delete(TABLE_NAME, "id = ?", arrayOf(memoId.toString()))
                    Toast.makeText(this, "削除しました", Toast.LENGTH_SHORT).show()
            }
「削除」ボタンが押されたら削除できるようにします。
保存処理部分と同じようにwritableDatabaseプロパティを使用します。
このプロパティのdeleteメソッドを使用して削除します。
このメソッドの引数は以下の通りです。
- テーブル名
- 条件式
- idを指定
- 条件値
- memoIdw使用
ちなみに削除後、その旨のアラートメッセージを表示します
このActivityのレイアウトファイルです。
<?xml version="1.0" encoding="utf-8"?>
<androidx.constraintlayout.widget.ConstraintLayout xmlns:android="http://schemas.android.com/apk/res/android"
    xmlns:app="http://schemas.android.com/apk/res-auto"
    xmlns:tools="http://schemas.android.com/tools"
    android:layout_width="match_parent"
    android:layout_height="match_parent">

    <EditText
        android:id="@+id/text_title"
        android:layout_width="0dp"
        android:layout_height="72dp"
        android:layout_marginStart="16dp"
        android:layout_marginTop="12dp"
        android:layout_marginEnd="16dp"
        android:ems="10"
        android:inputType="textPersonName"
        app:layout_constraintEnd_toEndOf="parent"
        app:layout_constraintHorizontal_bias="0.555"
        app:layout_constraintStart_toStartOf="parent"
        app:layout_constraintTop_toBottomOf="@+id/label_title" />

    <EditText
        android:id="@+id/text_content"
        android:layout_width="0dp"
        android:layout_height="442dp"
        android:layout_marginStart="16dp"
        android:layout_marginTop="12dp"
        android:layout_marginEnd="16dp"
        android:ems="10"
        android:gravity="start|top"
        android:inputType="textMultiLine"
        app:layout_constraintEnd_toEndOf="parent"
        app:layout_constraintStart_toStartOf="parent"
        app:layout_constraintTop_toBottomOf="@+id/label_body" />

    <TextView
        android:id="@+id/label_title"
        android:layout_width="115dp"
        android:layout_height="36dp"
        android:layout_marginStart="20dp"
        android:layout_marginTop="16dp"
        android:text="タイトル"
        app:layout_constraintStart_toStartOf="parent"
        app:layout_constraintTop_toTopOf="parent" />

    <TextView
        android:id="@+id/label_body"
        android:layout_width="115dp"
        android:layout_height="36dp"
        android:layout_marginStart="20dp"
        android:layout_marginTop="20dp"
        android:text="本文"
        app:layout_constraintStart_toStartOf="parent"
        app:layout_constraintTop_toBottomOf="@+id/text_title" />

    <Button
        android:id="@+id/back_button"
        android:layout_width="79dp"
        android:layout_height="41dp"
        android:layout_marginTop="16dp"
        android:layout_marginEnd="16dp"
        android:text="戻る"
        app:layout_constraintEnd_toEndOf="parent"
        app:layout_constraintTop_toTopOf="parent" />

    <Button
        android:id="@+id/delete_button"
        android:layout_width="79dp"
        android:layout_height="41dp"
        android:layout_marginTop="16dp"
        android:layout_marginEnd="8dp"
        android:text="削除"
        app:layout_constraintEnd_toStartOf="@+id/back_button"
        app:layout_constraintTop_toTopOf="parent" />

    <Button
        android:id="@+id/save_button"
        android:layout_width="79dp"
        android:layout_height="41dp"
        android:layout_marginTop="16dp"
        android:layout_marginEnd="8dp"
        android:text="保存"
        app:layout_constraintEnd_toStartOf="@+id/delete_button"
        app:layout_constraintTop_toTopOf="parent" />

</androidx.constraintlayout.widget.ConstraintLayout>
DBHelper
DBを操作するためにSQLiteOpenHelperを継承したクラスを作成します。
このクラスがDBの作成やテーブルの作成、データの操作のための機能を提供してくれます。
package com.example.dbsample

import android.content.Context
import android.database.sqlite.SQLiteDatabase
import android.database.sqlite.SQLiteOpenHelper

class DBHelper(context: Context?): SQLiteOpenHelper(context, DBNAME, null, version) {
    companion object {
        private const val DBNAME = "DBSample.sqlite"
        private const val version = 1
    }

    override fun onCreate(db: SQLiteDatabase?) {
        db?.let {
            it.execSQL("create table memos (id integer primary key, title text, content text)")
        }
    }

    override fun onUpgrade(p0: SQLiteDatabase?, p1: Int, p2: Int) {

    }

    override fun onOpen(db: SQLiteDatabase?) {
        super.onOpen(db)
    }
}
onCreateメソッドがデータベースが作成されたときに実行される関数です。
ここではmemosテーブルを作成しています。
すでにデータベースが作成されていた場合はこの関数は実行されません。
onUpgradeはデータベースのバージョンが更新された時、
onOpenはデータベースが開かれたときに実行されます。
memosテーブルの構成とレコード例です。
| id | title | content |
| 1 | タイトル1 | めも1 めも1 |
| 2 | タイトル2 | めも2 |
以上で完成です。
細かな部分で改良の余地はあると思いますが、
一通りメモ機能として動くサンプルが作れたかなと思います。