【Kotlin×Android】リストビューのレイアウトカスタマイズ
リストビューはデフォルトのままだとテキストしか表示できませんが、
自分でレイアウトを作りそれを使用するでテキスト以外の情報も表示させることができるようになります。
今回はリストビューのレイアウトをカスタマイズする方法を紹介します。
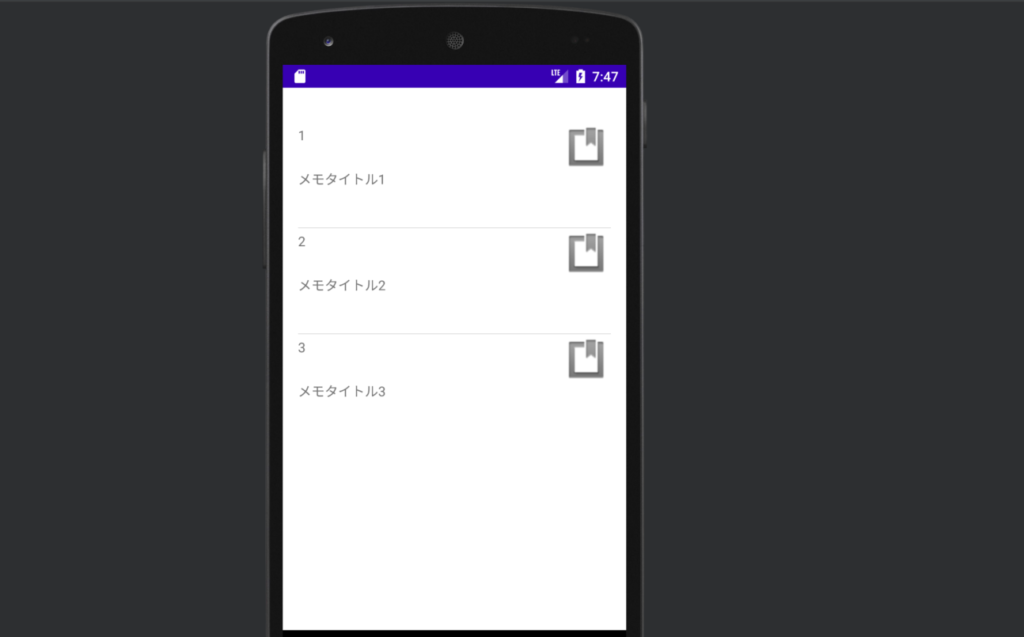
以下のような画面を作成します。
必要なもの
カスタマイズするために必要なものは以下お通りです。
- BaseAdapterを継承したアダプタークラス
- リストに表示させる情報を定義したdataクラス
- リストのアイテムとして表示させるlayoutファイル
BaseAdapterを継承したアダプタークラス
package com.example.listviewcustom

import android.content.Context
import android.view.LayoutInflater
import android.view.View
import android.view.ViewGroup
import android.widget.BaseAdapter
import android.widget.TextView

class CustomListAdapter(private val context: Context, private val data: List<ListItem>, private val resource: Int): BaseAdapter() {
    private val inflater = context.getSystemService(Context.LAYOUT_INFLATER_SERVICE) as LayoutInflater
    override fun getCount(): Int {
        return data.size
    }

    override fun getItem(p0: Int): ListItem {
        return data[p0]
    }

    override fun getItemId(p0: Int): Long {
        return data[p0].id
    }

    override fun getView(p0: Int, p1: View?, p2: ViewGroup?): View {
        val item = getItem(p0)
        val view = p1 ?: inflater.inflate(resource, null)
        view.findViewById<TextView>(R.id.text_title).text = item.title
        view.findViewById<TextView>(R.id.text_id).text = item.id.toString()
        return view
    }
}
CustomListAdapter(private val context: Context, private val data: List<ListItem>, private val resource: Int)
コンストラクターで各種必要な情報を受け取ります。
- context
- コンテキスト
- data
- 表示させるデータ
- resource
- レイアウトファイル
private val inflater = context.getSystemService(Context.LAYOUT_INFLATER_SERVICE) as LayoutInflaterレイアウトファイルをViewのオブジェクトに変換するためにLayoutInflaterを取得します。
後で出てきますが、このオブジェクトのiflateメソッドを使用します
override fun getCount(): Int {
    return data.size
}

override fun getItem(p0: Int): ListItem {
    return data[p0]
}

override fun getItemId(p0: Int): Long {
    return data[p0].id
}
この部分は何をするものなのか何となくイメージできると思います。
データの個数、アイテム、アイテムのIDをそれぞれ取得します。
    override fun getView(p0: Int, p1: View?, p2: ViewGroup?): View {
        val item = getItem(p0)
        val view = p1 ?: inflater.inflate(resource, null)
        view.findViewById<TextView>(R.id.text_title).text = item.title
        view.findViewById<TextView>(R.id.text_id).text = item.id.toString()
        return view
    }
この部分でviewに値を設定しています。
inflateメソッドでレイアウトファイルをViewに変換しています。
ただレイアウトファイルの解析は時間がかかるため再利用できるものがある場合はそれを使用します。
リストに表示させる情報を定義したdataクラス
package com.example.listviewcustom

data class ListItem(
    val id: Long,
    val title: String,
)
リストのアイテムとして表示させたい情報を定義します。
今回はidとtitleを定義しました。
リストのアイテムとして表示させるlayoutファイル
<?xml version="1.0" encoding="utf-8"?>
<androidx.constraintlayout.widget.ConstraintLayout xmlns:android="http://schemas.android.com/apk/res/android"
    xmlns:app="http://schemas.android.com/apk/res-auto"
    xmlns:tools="http://schemas.android.com/tools"
    android:layout_width="match_parent"
    android:layout_height="match_parent">

    <TextView
        android:id="@+id/text_title"
        android:layout_width="413dp"
        android:layout_height="60dp"
        android:text="title"
        app:layout_constraintEnd_toEndOf="parent"
        app:layout_constraintHorizontal_bias="0.0"
        app:layout_constraintStart_toStartOf="parent"
        app:layout_constraintTop_toBottomOf="@+id/text_id" />

    <TextView
        android:id="@+id/text_id"
        android:layout_width="107dp"
        android:layout_height="46dp"
        android:layout_marginTop="4dp"
        android:layout_marginEnd="304dp"
        android:text="id"
        app:layout_constraintEnd_toEndOf="parent"
        app:layout_constraintHorizontal_bias="0.0"
        app:layout_constraintStart_toStartOf="parent"
        app:layout_constraintTop_toTopOf="parent" />

    <ImageView
        android:id="@+id/imageView2"
        android:layout_width="52dp"
        android:layout_height="48dp"
        android:layout_marginTop="2dp"
        app:layout_constraintEnd_toEndOf="parent"
        app:layout_constraintTop_toTopOf="parent"
        app:srcCompat="@android:drawable/ic_input_get" />

</androidx.constraintlayout.widget.ConstraintLayout>
idを表示させるためのTextView、
titleを表示させるためのTextView、
画像を表示させるためのImageViewを配置しています。
MainActivity
package com.example.listviewcustom

import android.os.Bundle
import androidx.appcompat.app.AppCompatActivity
import android.widget.ListView

class MainActivity : AppCompatActivity() {

    override fun onCreate(savedInstanceState: Bundle?) {
        super.onCreate(savedInstanceState)
        setContentView(R.layout.activity_main)

        val listView = findViewById<ListView>(R.id.listView)
        val data = listOf(
            ListItem(1, "メモタイトル1"),
            ListItem(2, "メモタイトル2"),
            ListItem(3, "メモタイトル3"),
        )
        listView.adapter = CustomListAdapter(this, data,R.layout.list_item)
    }
}
ここまでくればやることは簡単で先ほど定義したdataクラスであるListItemの配列を作成し、CustomListAdapterに渡します。
さらにそれをListViewのadapterに設定すれば完了です。
<?xml version="1.0" encoding="utf-8"?>
<androidx.constraintlayout.widget.ConstraintLayout xmlns:android="http://schemas.android.com/apk/res/android"
    xmlns:app="http://schemas.android.com/apk/res-auto"
    xmlns:tools="http://schemas.android.com/tools"
    android:id="@+id/coordinatorLayout"
    android:layout_width="match_parent"
    android:layout_height="match_parent"
    tools:context=".MainActivity" >

    <ListView
        android:id="@+id/listView"
        android:layout_width="0dp"
        android:layout_height="wrap_content"
        android:layout_marginStart="16dp"
        android:layout_marginTop="36dp"
        android:layout_marginEnd="16dp"
        app:layout_constraintEnd_toEndOf="parent"
        app:layout_constraintHorizontal_bias="1.0"
        app:layout_constraintStart_toStartOf="parent"
        app:layout_constraintTop_toTopOf="parent" />
</androidx.constraintlayout.widget.ConstraintLayout>
MainActivityのレイアウトにはListViewのみを配置しています。